Monday, June 30, 2014

Astrophotography: The Andromeda Galaxy

Galaxies tend to be much more sensitive to light pollution as compared to other deep sky objects. Living in a city-state with heavy light pollution, imaging galaxies is very challenging indeed. Their low surface brightness, coupled with the fact that they emit light in all wavelengths (therefore rendering astronomical filters useless) makes them difficult targets to acquire. Aside from the Milky Way, I had my first try imaging a galaxy, or rather, three of them, two nights ago. My target is naturally the Great Andromeda Galaxy, M31, as it is the brightest galaxy in the sky. The difficulty in shooting M31 is in bringing out its dark lanes of cold molecular gas. Although the core shines bright, the dim spiral arms make it challenging to process. Also, M31 is huge, not just in physical size, but also in angular size as seen from Earth. It covers the area of six full moons in the sky, but we do not see it in all its glory because of, once again, low surface brightness. 

Photographic Information:

Imaging location: Changi, Singapore (Light pollution: Red zone/Outer City)
Date of data acquisition: 29 June 2014
Exposure Details: ~50min, 800mm FL at f/4
Camera: Canon EOS 600D Unmodified
Stacked with DSS, adjustment of curves and colors in Adobe Photoshop CS6. 


Shining the light of a trillion suns, the Andromeda galaxy and its two neighbours, M32 and M110 as pictured here, lie 2 million light years away. Although the Andromeda Galaxy is the closest spiral galaxy to the Milky Way, light, the fastest thing in the universe, takes a whopping two million years to arrive into the mirror of my telescope. Looking at the andromeda galaxy, we are looking at the light that originated from the stars long before modern humans have even evolved. 

Astrophotography: The Dumbbell Nebula

Nebulae often signify the important events of a star's life. Where large diffuse nebulae typically form the materials needed for starbirth, planetary nebulae and supernova remnants signify the death of stars. Whether a dying star becomes a supernova or a planetary nebula depends on its mass: high mass stars, with large amounts of matter, can collapse gravitationally at the end of their lives, overcoming degenerate pressures and creating a sudden runaway nuclear reaction. Low and medium mass stars, with insufficient mass to collapse under its own weight, will slowly expel its outer layers in a slow and gradual death, forming a planetary nebula. One such example of a star that is undergoing this process is the dumbbell nebula. As the star puffs out its outer layers, the atmosphere of the star begins to disperse, creating a gas cloud that surrounds what used to be the core of the star - a white dwarf. Although nearing the end of their lives, white dwarf stars still emit high amounts of high energy radiation, primarily in the ultraviolet range. This ultraviolet radiation is capable of ionising the surrounding gas cloud, resulting in the emission of light as the ions recombine with electrons to form electrically neutral atoms. The recombination process produces a very exact wavelength of light, dependent on the nature of the ion, and the orbitals in which the electron transit involves. Since planetary nebulae are formed at the end of a star's life, large amounts of the higher elements tend to be present in the expanding nebular cloud. One such example is oxygen, which can produce greenish-blue light during ion-electron recombination. This is why the dumbbell nebula glows so strongly in the blue-green part of the spectrum.  


Photographic Information:

Imaging location: Changi, Singapore (Light pollution: Red zone/Outer City)
Date of data acquisition: 29 June 2014
Exposure Details: ~20min, 800mm FL at f/4
Camera: Canon EOS 600D Unmodified
Stacked with DSS, adjustment of curves and colors in Adobe Photoshop CS6. 

Sunday, June 29, 2014

Astrophotography: The Lagoon Nebula Revisited, and the Trifid Nebula

With cloud cover obscuring much of the view of Messier 8, the Lagoon Nebula during my previous shoot, I was pleasantly greeted by clear skies with superb transparency last night. It was by far my most productive astrophotography session, clocking a total of four objects. I managed to try out one of the darkest spots in my heavily light polluted country, and it really made the difference. Without further ado, I present the Lagoon and Trifid Nebulae of Sagittarius:

A.) The Lagoon Nebula

The Lagoon Nebula, also known as Messier 8, is a region of active star formation. Located in the constellation of Sagittarius, the nebula glows bright in the Hydrogen Alpha spectrum.

Photographic Information:

Imaging location: Changi, Singapore (Light pollution: Red zone/Outer City)
Date of data acquisition: 29 June 2014
Exposure Details: ~45min, 800mm FL at f/4
Camera: Canon EOS 600D Unmodified
Stacked with DSS, adjustment of curves and colors in Adobe Photoshop CS6. 


B.) The Trifid Nebula

The Trifid Nebula, also known as Messier 20, is a nebula located in the constellation of Sagittarius, with a very close proximity to the Lagoon Nebula. The striking feature about this nebula is its trifurcated shape, formed by dark lanes of molecular clouds cutting through the pink hydrogen alpha region into three parts, hence its name. The trifid nebula is an intriguing object because it contains all the three types of nebula: Emission in the pink region, absorption in the dark lanes, and reflection in the blue region. 

Photographic Information:

Imaging location: Changi, Singapore (Light pollution: Red zone/Outer City)
Date of data acquisition: 29 June 2014
Exposure Details: ~30min, 800mm FL at f/4
Camera: Canon EOS 600D Unmodified
Stacked with DSS, adjustment of curves and colors in Adobe Photoshop CS6.


Sunday, June 22, 2014

Astrophotography: The Lagoon Nebula

Astrophotography is one of those things that can leave many people feeling frustrated, particularly when it comes to uncontrollable variables like the weather. Because of the sensitivity of optical transparency to volatile sky conditions, imaging conditions can often be far from perfect. However, this does not mean that it is completely impossible to shoot under cloud cover. From locations where relatively clearer skies are rare, one has to make do with moving layers of clouds obscuring the faint starlight coming from the distance. 

Indeed, such was the case when I attempted to image the Lagoon Nebula. Classified in Messier's catalogue as the 8th object, the Lagoon Nebula is a strong Hydrogen Alpha emitting region, with active star formation occurring as dense hydrogen clouds coalesce into a nuclear furnace. Despite the cloud cover, the stretched image unveils detail that could not be seen before post processing. Intricate tendrils of dark molecular clouds can be seen, silhouetting the glow of ionised gas. 


Photographic Information:

Imaging location: East Coast Park, Singapore (Light pollution: Red zone/Outer City)
Date of data acquisition: 21 June 2014
Exposure Details: ~40min, 800mm FL at f/4
Camera: Canon EOS 600D Unmodified
Stacked with DSS, adjustment of curves and colors in Adobe Photoshop CS6. 

Wednesday, June 11, 2014

Astrophotography: A shot at widefield imaging

Being primarily a deep sky astrophotographer, I rarely attempted shooting the stars using just a camera and a lens, set on a non-tracking tripod. I guess the main reason for this is that I live in such a light polluted city, which offers little by way of widefield shots. Although some pioneers have now demonstrated that shooting the milky way is possible even from the most light polluted spots imaginable, the images that are to follow are taken from a suburb in a neighbouring country. 

Although I have been into astronomy for several years, it's rather surprising that I never saw the summer milky way before, that is, until my recent trip overseas a couple of weeks ago. Of the times when I ventured out of my country, I have never seen the vast expanse of the galactic bulge, mainly because I typically leave the country only during the end of the year when the winter milky way is up. 

Anyhow, when I finally got to see the milky way with my own eyes, it was a breathtaking moment. Everywhere I looked, the sky was filled with countless stars. The Milky Way was a strange glowing cloud hanging in the sky, stretching from one end to the other. Through binoculars, for every star you can see with the naked eye, you could see a hundred more. With a telescope, the grey mist of the milky way is resolved into the individual stars that make it up. Looking at the milky way with different instruments makes it seem almost fractal-like. No matter how much you zoom, all you see are countless stars fading into infinity. 

Of course, my instinct was to grab my camera and start shooting. With a micro four thirds and wide angle 12mm lens, I caught the milky way in all its glory and splendor. 

Photographic Information:

Imaging location: Bekok, Malaysia (Light pollution: Suburban Sky/Yellow Zone)
Date of data acquisition: 1 June 2014
Exposure Details: ~5min, 12mm FL at f/2 (on a M4/3 Crop)
Camera: Olympus OM-D EM10 Unmodified
Stacked with DSS, adjustment of curves and colors in Adobe Photoshop CS6. 


With skies staying clear before midnight till dawn, I obviously had to grab the opportunity and image more objects. Because of my short focal lengths used, limited by gear and lack of tracking, most deep sky objects remained out of reach. The largest object in terms of angular size that can at least show a hint of detail with my setup is probably the rho ophiuchus cloud complex. The rho ophiuchus cloud complex is a reflection/absorption nebula that surrounds the star Antares. With dark lanes extending from the Antares region towards the central bulge, this is a prime target for widefield astrophotography. 


The image above frames Antares nicely close to the centre, with the dark lanes extending towards the bottom of the frame. Reflection nebulosity is visible as well. 

Repositioning the direction of the camera, I attempted to shoot the nebula whilst keeping the dark lanes of the milky way partly in view. 


This image shows the intricate colour details, although part of it is contributed by chromatic aberrations. The focus of the image is also not as good as the previous image, which is undoubtedly difficult to get while shooting at a very fast focal ratio. 

Photographic Information (for both images of the Rho Ophiuchus complex):

Imaging location: Bekok, Malaysia (Light pollution: Suburban Sky/Yellow Zone)
Date of data acquisition: 1 June 2014
Exposure Details: ~10min, 50mm FL at f/1.8 (on an APSC crop)
Camera: Canon EOS 600D Unmodified
Stacked with DSS, adjustment of curves and colors in Adobe Photoshop CS6. 

Friday, March 14, 2014

Astrophotography: On the Importance of Post Processing

I'ld love to create a how-to guide on astrophotography, although a full length article detailing my workflow would probably bore any reader to death. In this post, I will be going slightly more in-depth on the practicalities of Astrophotography, particularly on the topic of post processing. Here, I will explain how I got the image of the Orion Nebula as I uploaded in this post

Before I go any further, I'ld like to mention quickly the three main components of Astrophotography. These are data acquisition, stacking, and post processing. Data acquisition refers to the actual act of going out to take photos. The actual setup of astrophotography equipment deserves an entire article in its own right, and there is already quite a large amount of information on this, because it is the first, and perhaps most important step. To cut the long story short, data acquisition for deep sky astrophotography involves taking a series of extended exposures, each of which are known as sub-exposures (or subs for short), and subsequently combining them in a process known as stacking.

Stacking is one of the key techniques in astrophotography, where catching faint light is of utmost priority. An extended single exposure can only do so much before mount tracking errors, sudden shakes, or unfortunate incidents like planes crossing the field of view destroy the image. To prevent this, multiple images are combined to create a master exposure, a high data RAW (e.g. TIFF) file where data can be extracted from through post-processing software, such as Photoshop. In order to stack images, it is necessary to have stacking software. A free example (and one of the best, in my opinion), is deep sky stacker. Aside from just the sub exposures, other types of exposures such as dark frames and bias frames are also applied, which I will elaborate further in another future article.

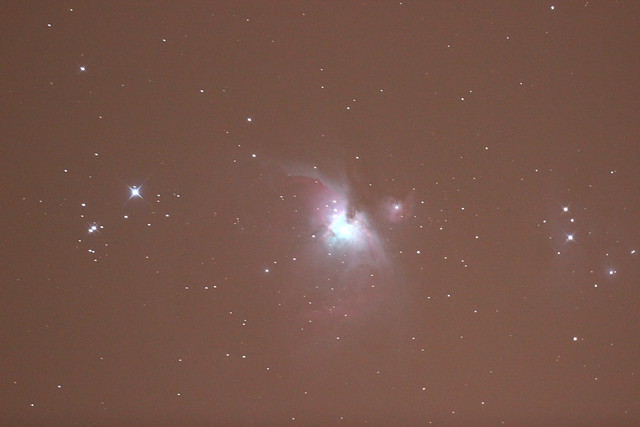
Before I bore you any further with massive walls of text, here is a picture of what one sub exposure looks like. This particular exposure is 20 seconds long, and shot at ISO 800.


Here, you can see that the sky background glows a bright orange. This is the effect of heavy light pollution from the city, with mercury-sodium lamps blasting orange light into the atmosphere and drowning precious starlight. The inner nebulosity is still clearly visible, with a hint of the outer arms, as well as nebulosity in the running man nebula. However, with a nebula as bright as M42, astrophotography from cities is still possible. 

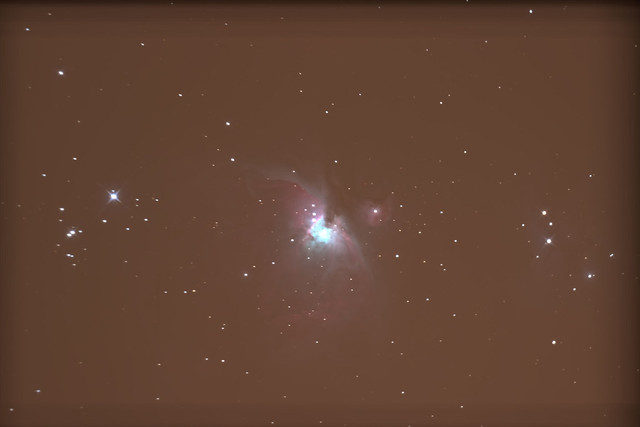
The next image below shows a stack of a few hundred of such sub-exposures. The total integrated exposure time, adding all the data from the subs, is about 1 hour. 


The first thing you may notice upon seeing this picture is that it appears to lack the detail of the final image. In fact, it appears less detailed than the original sub exposure! Surely stacking hundreds of subs would create something that looks better than one!

Well, it is important to think of these preliminary image files not as simply pictures on a film, but as a data file. The second image is a massive 32 bit TIFF file (although it is a JPEG here, since I can't upload TIFF files to blogger), as compared to the 8 bit JPEG above. TIFF files are normally hundreds of megabytes, while JPEG files of the same resolution are normally less than 10 MB. Aside from this, the image noise, or graininess, is much more pronounced in a single sub than the stacked image. Image noise drowns out actual data, so the low noise TIFF actually contains much more data (signal-to-noise ratio) than the original sub.

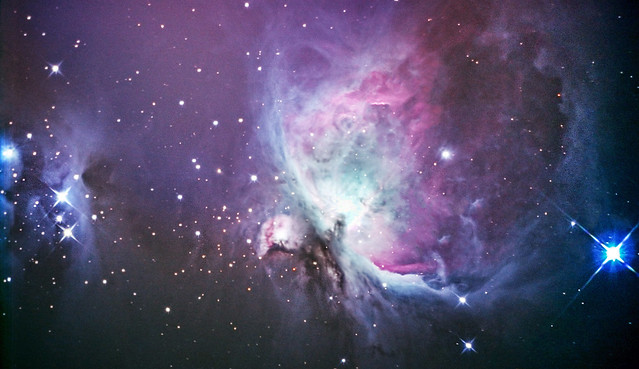
Now that we have the stacked image, it should be clear why post-processing is such an integral part of astrophotography. Firstly, it removes the unwanted orange colouration of the background sky, which plagues all images taken from city centres, all the way to even suburban sites. Secondly, it helps to pull out faint detail from the high data RAW file to show the fullest extent of nebulosity captured by the original data files. 

In order to do so, I applied a series of curves to stretch the histogram data. Data stretching increases the visibility of faint areas, as well as to increase the overall contrast. Typically, several iterations are done, with layer masks introduced in certain cases to improve dynamic range, or to even out uneven field illumination. In the case of dynamic range, the dynamic range of the orion nebula is actually quite large, due to the core being much brighter than there outer areas. As such, layer masks are applied to prevent overexposure (data clipping) of core detail. 

In between stretching, I also alter the colour balance to give a more neutral colour to the sky background. Normally, the cyan and blue channels are increased to neutralise the effect of the orange-red skyglow. Further changing the degree of colour balancing on the shadows, midtones and highlights separately gives further control, allowing the colour balance of the nebula itself to be maintained. 

Aside from stretching and rebalancing the colours, I also manually edited some of the stars to remove star trails arising from the optical issues of a parabolic mirror (and bad collimation). Preferably, such issues should be settled during the data acquisition stage, although in this case I only solved the problem afterwards. 

Once again, here is the final image. 


Compared to the original sub-exposure and stacked RAW file, this image shows quite a lot of detail that is only extracted through post processing. Indeed, this is why post processing is an integral part of deep sky Astrophotography. Within the photography community, post processing is something that is highly controversial, with opponents chanting the mantra that everything should be done right in camera. Such matters are mostly personal preference, although the fact that astrophotography necessitates this makes it a form of photography not for the purist. 

A question that many ask, therefore, is whether these images are 'real', or truly representative of what is out there. The answer is actually both yes and no. Yes in the sense that what you see in the image really exists in space, but no in the sense that no human eye, through any optical instrument, will ever see such a view. To me, the fine balance between showing what's real, as well as making the image beautiful, is struck here. Perhaps, this is what makes astrophotos taken by yourself special to you, in that the final image is representative of YOUR opinion. 

Monday, March 3, 2014

Astrophotography: The Omega Centauri Globular Cluster

The Omega Centauri Globular Cluster in the southern constellation of Centaurus, featuring a beautiful globe of stars concentrated towards the centre. 

Photographic Information:

Imaging location: Kranji, Singapore (Light pollution: Red zone/Outer City)
Date of data acquisition: 1 March 2014
Exposure Details: ~45min, 800mm FL at f/4
Camera: Canon EOS 600D Unmodified
Stacked with DSS, adjustment of curves and colors in Adobe Photoshop CS6. 


Description:

The Omega Centauri Globular cluster is the largest globular cluster in the Milky Way Galaxy, and is located 15,800 light years away in the constellation of Centaurus. With probably over a million stars, and a combined mass of over 4 million suns, Omega Centauri is the brightest globular cluster that can be seen from Earth, shining at a visual magnitude of +3.9, an easy target with the naked eye from suburban skies. 

Because of the unique features of Omega Centauri that distinguishes it from other globular clusters, it is thought that it originated as a separate dwarf galaxy that got consumed by the Milky Way.